
Earlier this year, I decided to upgrade my singlepseed bikepacking setup to use a full frame bag instead of a partial frame bag. I wanted to carry my hydration bladder in the frame bag to get that weight off of my back – literally. I had been following the NoLogo Bikepacking Bags blog for a few months and liked the bags being produced so I contacted Graham through Twitter and asked about a custom bag.
Graham admitted that he had never built a frame bag built to hold a hydration bladder. Living in Scotland, he has access to plenty of water on his rides, but he was willing to work with me to make it happen. Check out his blog to see examples of his work but also some great scenery from his rides. (Note to self, must make a trip to Scotland and see this in person).
The Design
Did you know a 3L/100oz bladder will weigh over 6.5 pounds when filled with water? For bikepacking and long days on the trail, I wanted to get this weight into the frame bag instead of being on my back. The other requirement for the bag was that I needed to keep one of my bottle cages to store a water bottle that would hold the water for my morning coffee. Yes, that’s really how I think about things – coffee is always a consideration.
Using posterboard, I made a full size template of my front triangle and shipped it off to Scotland. The template identifies the location of bottle cage mounts, cable stops, and straps for my top tube bag.

Before building the bag, Graham and I traded a few messages on Twitter and email. The one on one support and collaboration is is one of the great things about custom gear from small manufacturers. Graham was willing to answer all of my questions and he actually came up with a much better design in the end.

He decided to make the frame bag a full triangle bag and not have the cutout for the bottle cage. Instead, there would be a divider in the bag that would create a section to hold a water bottle. This extra compartment could hold a water bottle or it could be used to hold other small items which makes this design more versatile than my original idea.

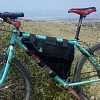
Photo Credit – Graham
The Product
The package showed up to my house a few weeks later and the bag was fantastic. The craftmanship is excellent. It fit the frame perfectly, holds a hydration bladder, a spare bottle, and is very well made. There are plenty of velcro straps to hold the bag in place.
One of my favorite touches is the little zipper cover at the front the zippers on each side. If the zipper is not fully closed or if it’s raining hard, these little covers prevent any moisture or grime from getting inside the bag.

My plan was to store my 100oz bladder in the bag, but when it was full, it was just too big for my medium sized frame. A larger frame could probably hold the 100oz bladder. Luckily I had a 70oz bladder in the garage, and this size was a good fit for my frame.

Photo credit – Graham
The initial design for the bag was to hold the bladder in a special pocket on the left side of the bag. I played around with the baldder in the main compartment and the left pocket. Another great feature Graham included was being able to route the bladder tube out of the frame bag from either the left pocket or the main compartment of the bag. I ended up storing the bladder in the main compartment since this configuration allows the water to sit lower in the frame. It also let’s me store food and other small items in the left pocket.
With the bladder in the frame bag, the drinking tube comes out just under the top tube. I pulled the tube all the way through and then looped it around the handlebars. This makes it long enough to drink from, but I haven’t quite figured out the best way to route it so that it doesn’t get in the way when riding. If you have any ideas for a better way, please let me know.

The Happy Bikepacker
Overall, the frame bag turned out even better than I expected. It was great to work with Graham on ideas and then to see how he made such a great bag. Having the hydration bladder in the bag and off of my back is going to make bikepacking even more fun.
The bag holds all of my water, food for an overnighter, my StayOutThere kit, and still has room left for other items. I’m happy to add this frame bag to my bikepacking kit.
If you have thought about working with small manufacturers like Graham but never have, you need to do so! The costs are a tad bit higher. However, the quality of the gear is so much better and the ability to customize your gear to your personal needs is well worth it.