The previous post walked through a first backyard overnight trip to try out bikepacking. If you are here from that post, I’m assuming you thoroughly enjoyed yourself in the “wild” for the night and want to continue on the bikepacking path.
Where does all of the gear go if there are no racks?
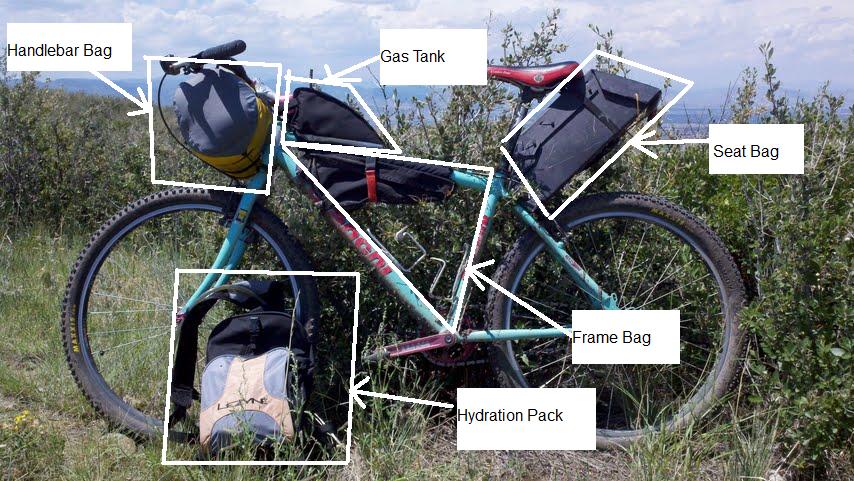
Based on my definition of bikepacking, there are no racks and panniers so how and where does all of the gear go? There are 5 areas available for gear on the bike. I know the graphic below is one of the most incredible things people have seen in weeks, but I’m really not a professional graphic artist.
If you are a gear nut, an analytical type, an engineer, or exhibit obsessive traits, you may end up with a garage full of gear while trying out combination after combination of packing your gear. I warned you and it’s now out of my hands. However, if you come up with some crazy ideas, please let me know because I’m all about the crazy ideas.
Storing and packing gear can be the most fun part other than riding because you can get as creative as you want with what you carry, how you carry it, and where you carry it.
Handlebar bags -($10 – $100)
Options:
Revelate Designs Sling and Harness
2 Straps and Compression sack – use 2 simple side buckle straps to latch a compression bag to the handlebars. Cheapest option but the compression sack will bounce around.
What to pack:
The most common items for the handlebar bag are sleep systems (sleeping bag, shelter, ground cloth, and sleeping pad).
Notes:
I just received my Revelate Designs Sling and Small Pocket and I’m in the process of trying it out. Prior to this, I had 2 REI straps and they worked for short trips. See the Current Bikepacking Setup post for details. Based on the craftmanship and ease of use, I’ll be sticking with the Revelate Designs setup.
Gas tanks -($15 – $60)
Options:
Bikepacking bag makers (Revelate Designs, Carousel Design Works, F3 Designs, and Phantom Pack Systems)
What to pack:
Great place to store phone, snacks, sunscreen, and other items that you may use a lot.
Notes:
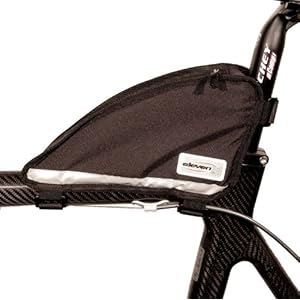
I currently use the Eleven81 bag even though it is intended to attach to the seat post. The velcro straps are placed in such a way that allows them to also work on the stem. The benefit is that this bag is a bit larger than the “bento” or feed bags.

Frame bags – ($30 – $150)
Options:
Again, all of the bikepacking gear makers have frame bags. Most provide a full frame bag that takes up the entire front triangle as well as partial bags that take up the top portion of the triangle and leave room for water bottle cages.
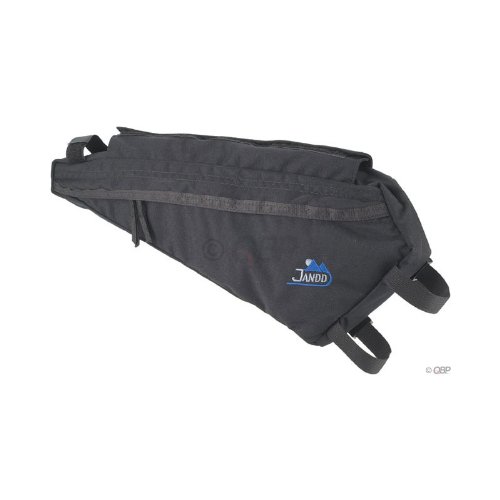
Jandd Frame Pack – Very similar to the partial bags that run the length of the top tube.
Eleven81 Frame bag – Fits in the back part of the triangle.
What to pack:
Food, water bladder, tools, extra water bottles, maps. Just about anything that isn’t a sleeping bag will fit into one of the full frame bags.
Notes:
I’m using the Jandd frame pack because I did not want to commit the $100+ dollars for a full customized bag. The Jandd is a bit small, but I have been very happy with it and I can store enough food for 2 days in the bag.

Seat bags – ($0 – $150)
Options:
As usual, the bikepacking gear makers have great options and they work great.
Another option is to make your own bag. See the notes below.
What to pack:
Sleep system if it’s not in the handlebar bag. Cycling clothing, insulated jacket, first aid kit, rain gear, tarp, cook system (if you use one), misc items that don’t get a lot of use.
Notes:
Ever seen one like my bike? It was a MYOG (Make Your Own Gear) special that I designed. Again, I didn’t want to drop the $100+ for an “official” bag. But the bigger reason reason was my desire to try and make my own gear. If you get into bikepacking or ultralight camping, there are lots of nuts just like me that try to make their own gear. I made this bag in about 4 hours with no cost and materials I already had on hand in my garage. Thanks to Kent Peterson for the ideas on coroplast construction.
If you would like more details on my seat bag design and function, leave a comment and I’ll be happy to provide more information and pictures.
Hydration packs – ($50 – $120)
Options:
Hydration packs are standard issue mountain bike gear so I won’t go into great detail. For bikepacking, try to find one that has a decent sized expandable area so that you can stash gear.
What to pack:
Water of course, but also bike tools, first aid, personal care items (toothbrush, sunscreen, soap, etc), rain gear, spare clothes, food.
Notes:
I’m using a Lezyne pack that is several years old and does not seem to be available any longer. I also have a Marmot Kompressor Plus pack that has more storage space and would be great for longer trips.
How to fit everything into the bags?
Now that I’ve covered the bags that store your gear, you have to figure out how to get all of your gear into the bags. Accept the fact that your first attempt will be very heavy and all of your gear will not fit onto the bike. That’s ok because you have to start somewhere.
Before you go and start shaving down your toothbrush to save space and weight, think about what you absolutely must have in your kit.
- Can you trade warmth at night for a very lightweight sleeping bag?
- Do you have to have a fresh pair of socks and shorts each day?
- Do you have back problems that prevent you from using a hydration pack?
- Do you get a sunburn in 3 minutes and require a gallon of sunscreen?
- Do you have to have coffee within 20 minutes of waking up in the morning?
For me, the one item I must have is my morning coffee. I can be cold in the morning and wearing stinky clothes, but if I have coffee, I’ll be smiling. I have reduced a lot of gear, but I always bring my coffee setup (more to come on this because it’s another great MYOG project).
Once you figure out what is on your “must have” list, remove one non-critical item from your gear list. Now try to pack up your bags. If everything doesn’t fit, remove one more item. Continue going through this exercise until you either get everything to fit or you realize you need to purchase a few lightweight items to make you kit more functional.
To save you some time, here are a few items you can remove if you are planning a one or two night trip:
- Spare jersey – a little stink never killed anyone
- Book
- Soap and towel – again, a little stink never killed anyone
- Spare socks – and again, a little stink never killed anyone
- Cooking stove – you can live off of cold food and junk food for a couple of days
If your gear is too heavy or doesn’t fit on the bike, you should focus on your sleep system because that is most likely where most of your bulk and weight are located. See my Current Bikepacking Setup post for some ideas on making your sleep system lighter. You will almost certainly have to give up the full tent, but tarps or bivy sacks can become your friend.
Happy gear researching, buying, and packing
Andy

